UpStream’s advanced permissions extension allows you to define nearly any scenario, and set your permissions to match. To do this, you create an XML document and enter it in the Advanced Permissions configuration section under UpStream settings.
Remember, we’re here to help — you can contact us at any time if you need help with the XML.
Getting Started with Advanced Permissions
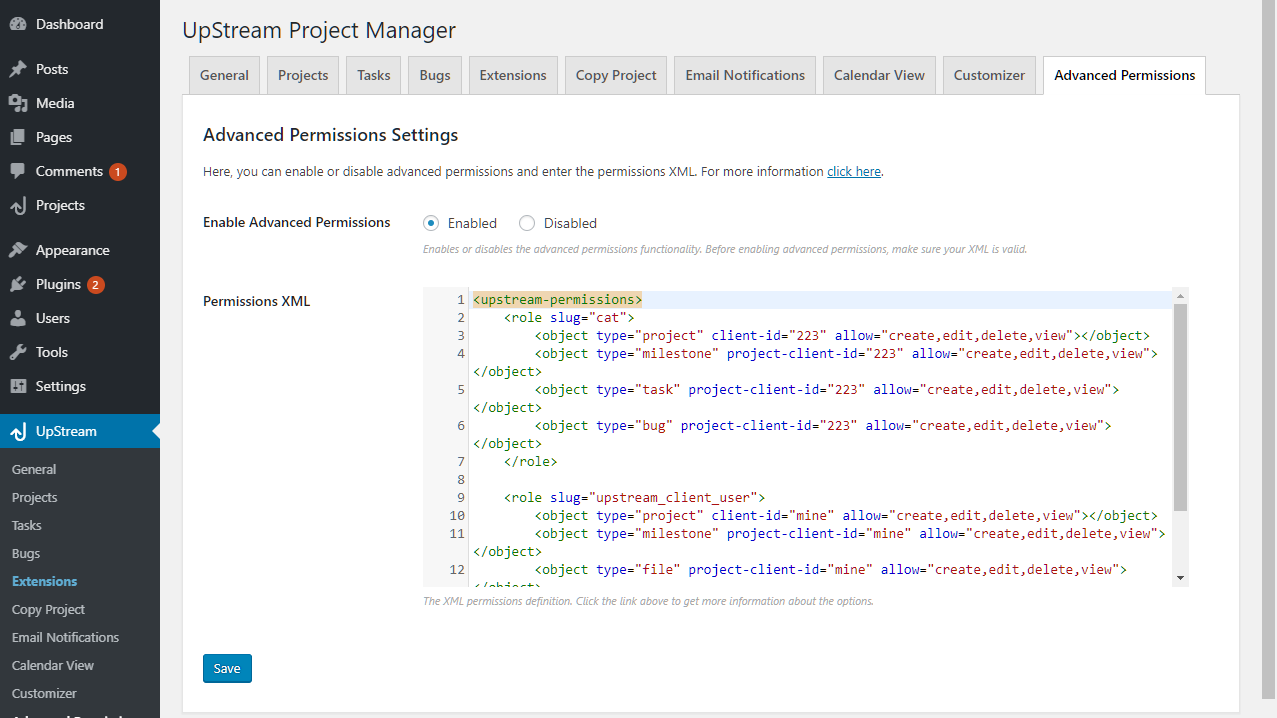
After you’ve installed the Advanced Permissions add-on, to get started with Advanced Permissions, go to your WordPress dashboard and select UpStream -> Advanced Permissions.
You will see a radio button, “Enable Advanced Permissions,” and a large code entry field, “Permissions XML.” By default, Advanced Permissions is disabled, and the standard permissions model is active. Once you’ve created your permissions XML, you can set “Enabled Advanced Permissions” to “Enabled” to use the permissions XML.
The UpStream permissions XML format is pretty simple. If you’re not familiar with XML, you can learn about it here. Here is the basic structure:
<upstream-permissions>

	<role slug="upstream_client_user">
		<object type="project" client-id="223" allow="create,edit,delete,view">
		</object>
	</role>
	<user username="mike">
		<object type="project" assigned-to="me" allow="create,edit,delete,view">
		</object>
	</user>

</upstream-permissions>
In order to make the most of UpStream Advanced Permissions, you should install the free Members plugin for WordPress. This allows you to create and view roles, which you can use in Advanced Permissions.
UpStream Advanced Permissions XML Structure
Top Level Tags
Each UpStream permissions XML document must start with an <upstream-permissions> tag. Within the <upstream-permissions> tag, you define users, and then under each user definition, you enter permissions rules.
A user definitions can be one of the following:
- To set permissions for any user with a certain role, you can use the
<role>tag. The syntax is<role slug="(enter slug here)">You can find the slug for a role using the Members plugin in Users -> Roles under the “Role” heading. (Note, this is different from the “Role Name”, which can’t be used with UpStream Advanced Permissions.) - To set permissions for an individual user by their username, you can use
<user username="(enter username here)">You can find the username in the WordPress dashboard by going to Users -> All Users and looking under the “Username” heading. - If you know the user’s ID number, you can also set permissions for an individual user by their user ID. To do this, use
<user id="(enter user ID here)">
Here are some examples of the <user> and <role> tags described above:
<upstream-permissions>

	<role slug="upstream_client_user">
             ...
	</role>
	<user username="mike">
             ...
	</user>
	<user id="655">
             ...
	</user>

</upstream-permissions>
Object and Field Tags
Object Tags
Under the <role> or <user> tags, you can enter a list of object tags. These describe objects that you can set permissions for. This is done using the following syntax:
<object type="(object-type)" rule="(predicate)" allow="(actions)">
Valid object types are:
- “project”
- “task”
- “file”
- “bug”
- “milestone”
Valid actions are: any combination of “view”, “edit”, “delete”, and “create” in a comma separated string. For example, “view,edit” or “view,create,delete”
Valid predicates are:
- assigned-to – a username of who the item is assigned to, or “me” for anything assigned to me, or “*” for anything assigned to anyone
- has-member – a username of who is a member of the project, or “me”
- project-assigned-to – for milestones, tasks, bugs, and files, this is the username that the parent project is assigned to, or “me” for projects assigned to me
- created-by – a username of who created the item, or “me” for anything created by me
- project-created-by – for milestones, tasks, bugs, and files, this is the username of the creator of the parent project, or “me” for projects created by me
- id – the ID of the object (you can find IDs in the admin dashboard in each list of items)
- project-id – for milestones, tasks, bugs, and files, this is the ID of the parent project
- category-slug – the slug for the category (you can find this in the list of categories in the WordPress admin dashboard)
- project-category-slug – for milestones, tasks, bugs, and files, the slug for the parent project
- client-id – for projects only, the ID of the client that the project belongs to (you can find this in the clients tab in the admin dashboard); you can also enter “mine” to allow UpStream Client Users to access projects for their client, or “mine-selected” to allow UpStream Client Users to access projects that they are selected for in their client
- project-client-id – for milestones, tasks, bugs, and files, the ID of the client that the parent project belongs to (you can find this in the clients tab in the admin dashboard) ; you can also enter “mine” to allow UpStream Client Users to access items in projects for their client, or “mine-selected” to allow UpStream Client Users to access items in projects that they are selected for in their client
Field Tags
Under an <object> tag, you can have a <field> tag, if you want to set field-level permissions for an item. By default, if you don’t have a field tag under an object, then all fields are viewable and editable. However, if you do have any field tag under an object, then all other fields are hidden.
For example: In the following code snippet, “sam” will be able to edit all fields of any project:
<upstream-permissions>
	<user username="sam">
		<object type="project" assigned-to="*" allow="create,edit,view,delete"></object>
	</user>
</upstream-permissions>
However, in this code snippet, “sam” can only view the title of any project:
<upstream-permissions>
	<user username="sam">
		<object type="project" assigned-to="*" allow="create,edit,view,delete">
			<field name="title" allow="view"></field>
		</object>
	</user>
</upstream-permissions>
Once any <field> tag is added to an object, all of the other fields are hidden by default.
You can also combine different permissions, and the user will get the maximum of all that apply.
In the following example, “sam” is a member of the “teachers” role:
<upstream-permissions>
	<role slug="teachers">
		<object type="project" assigned-to="*" allow="create,edit,view,delete">
			<field name="title" allow="view,edit">
		</object>
	</role>
	<user username="sam">
		<object type="project" assigned-to="*" allow="create,edit,view,delete"></object>
	</user>
</upstream-permissions>
Under the <user username=”sam”> tag, there is nothing under the project tag, so “sam” has full view/edit rights to all fields in any project — even through “sam” is part of the “teachers” role, and they only have view/edit access to the title field.
Making Projects Publicly Viewable
Another thing you can do with Advanced Permissions is make certain projects publicly viewable.
To make a project publicly viewable, you can use the user type=”anonymous” rule.
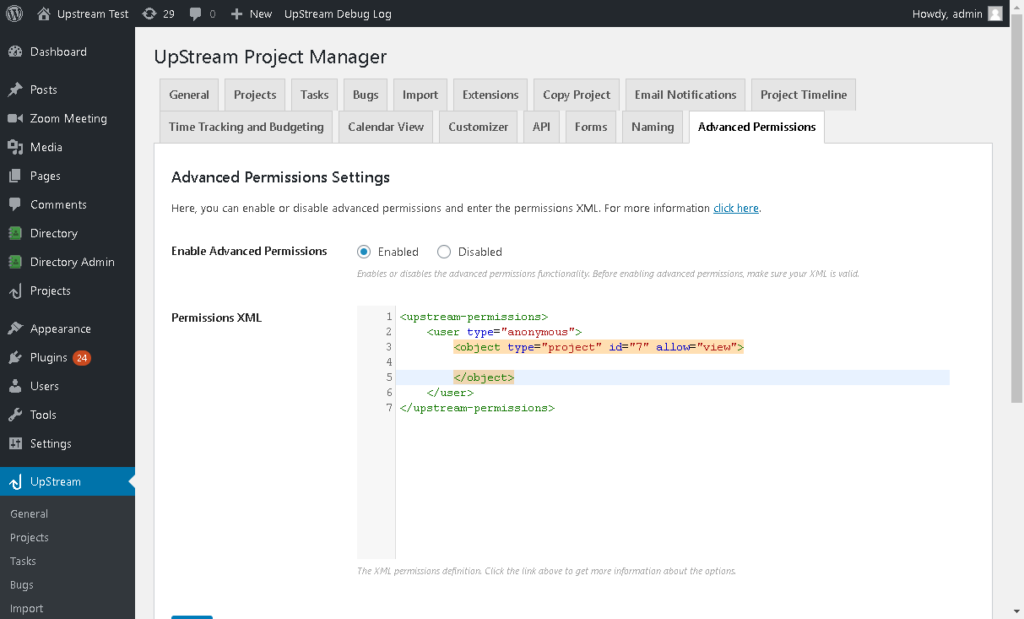
For example, to make a project with ID 7 publicly viewable, you can use the code below
<upstream-permissions>
   <user type="anonymous">
   <object type="project" id="7" allow="view"></object>
   </user>
</upstream-permissions>
Finally, select enable and click save to enable the rules.
There are a few notes to remember regarding public viewing:
- You can only allow public viewing, not editing
- Non users who go to your /projects URL will see all public projects
- You can use other predicates for the rule as well, such as assigned-to
Basic XML Examples
Here are some basic examples of XML.
Example 1: Re-create the standard UpStream Client User permissions model.
If you want to re-create the standard UpStream permissions model for Client Users, you can use the following. Note that UpStream Managers and Administrators automatically have access to everything.
<upstream-permissions>

	<role slug="upstream_client_user">
		<object type="project" client-id="mine-selected" allow="create,edit,delete,view"></object>
		<object type="milestone" project-client-id="mine-selected" allow="create,edit,delete,view"></object>
		<object type="file" project-client-id="mine-selected" allow="create,edit,delete,view"></object>
		<object type="task" project-client-id="mine-selected" allow="create,edit,delete,view"></object>
		<object type="bug" project-client-id="mine-selected" allow="create,edit,delete,view"></object>
	</role>

</upstream-permissions>
Example 2: Force the UpStream Client User Role to Only Allow Viewing and Commenting
The next example can be used to re-define the UpStream Client User role so that UpStream Client Users can view projects (and their components) for which they’re selected, and they can add comments — but they can’t edit anything else.
<upstream-permissions>
	<role slug="upstream_client_user">
		<object type="project" client-id="mine-selected" allow="view,edit">
			<field name="title" allow="view"></field>
			<field name="description" allow="view"></field>
			<field name="status" allow="view"></field>
			<field name="progress" allow="view"></field>
			<field name="client" allow="view"></field>
			<field name="client_users" allow="view"></field>
			<field name="categories" allow="view"></field>
			<field name="owner" allow="view"></field>
			<field name="start" allow="view"></field>
			<field name="end" allow="view"></field>
			<field name="comments" allow="view,edit"></field>
		</object>
		<object type="task" project-client-id="mine-selected" allow="create,view,edit">
			<field name="title" allow="view"></field>
			<field name="assigned_to" allow="view"></field>
			<field name="status" allow="view"></field>
			<field name="progress" allow="view"></field>
			<field name="milestone" allow="view"></field>
			<field name="start_date" allow="view"></field>
			<field name="end_date" allow="view"></field>
			<field name="comments" allow="view,edit"></field>
		</object>
		<object type="milestone" project-client-id="mine-selected" allow="create,edit,view">
			<field name="milestone" allow="view"></field>
			<field name="progress" allow="view"></field>
			<field name="tasks" allow="view"></field>
			<field name="assigned_to" allow="view"></field>
			<field name="start_date" allow="view"></field>
			<field name="end_date" allow="view"></field>
			<field name="categories" allow="view"></field>
			<field name="comments" allow="view,edit"></field>
		</object>
		<object type="file" project-client-id="mine-selected" allow="create,edit,view">
			<field name="title" allow="view"></field>
			<field name="created_by" allow="view"></field>
			<field name="created_at" allow="view"></field>
			<field name="assigned_to" allow="view"></field>
			<field name="description" allow="view"></field>
			<field name="file" allow="view"></field>
			<field name="comments" allow="view,edit"></field>
		</object>
		<object type="bug" project-client-id="mine-selected" allow="create,edit,view">
			<field name="title" allow="view"></field>
			<field name="assigned_to" allow="view"></field>
			<field name="severity" allow="view"></field>
			<field name="status" allow="view"></field>
			<field name="due_date" allow="view"></field>
			<field name="file" allow="view"></field>
			<field name="comments" allow="view,edit"></field>
		</object>
	</role>

</upstream-permissions>
Example 3: Allow a User to Create and Edit Project Components for Projects Assigned to Them
The next example allows a user with username “sam” to access a project assigned to them, and create or edit components (milestones, tasks, etc.). The example allows “sam” to add comments to the project and set the progress, but not edit any of the other project fields. It also doesn’t allow “sam” to delete project components.
<upstream-permissions>
	<user username="sam">
		<object type="project" assigned-to="me" allow="edit,view">
			<field name="title" allow="view"></field>
			<field name="description" allow="view"></field>
			<field name="status" allow="view"></field>
			<field name="progress" allow="view,edit"></field>
			<field name="client" allow="view"></field>
			<field name="client_users" allow="view"></field>
			<field name="categories" allow="view"></field>
			<field name="owner" allow="view"></field>
			<field name="start" allow="view"></field>
			<field name="end" allow="view"></field>
			<field name="comments" allow="view,edit"></field>
		</object>
		<object type="task" project-assigned-to="me" allow="create,edit,view"></object>
		<object type="milestone" project-assigned-to="me" allow="create,edit,view"></object>
		<object type="file" project-assigned-to="me" allow="create,edit,view"></object>
		<object type="bug" project-assigned-to="me" allow="create,edit,view"></object>
	</user>
</upstream-permissions>
Example 4: Re-define the UpStream User Role To Only Allow Users To Edit Projects They Create
This XML code re-defines the UpStream User role so that they can do anything with projects that they create — and anything with components of the projects they create. But they can only view projects created by others.
<upstream-permissions>
	<role slug="upstream_user">
		<object type="project" created-by="me" allow="view,edit"></object>
		<object type="task" project-created-by="me" allow="view,edit,create,delete"></object>
		<object type="milestone" project-created-by="me" allow="view,edit,create,delete"></object>
		<object type="file" project-created-by="me" allow="view,edit,create,delete"></object>
		<object type="bug" project-created-by="me" allow="view,edit,create,delete"></object>

		<object type="project" assigned-to="*" allow="view,create"></object>
		<object type="task" assigned-to="*" allow="view"></object>
		<object type="milestone" assigned-to="*" allow="view"></object>
		<object type="file" assigned-to="*" allow="view"></object>
		<object type="bug" assigned-to="*" allow="view"></object>
	</role>
</upstream-permissions>
Important Notes
Here are some important notes to keep in mind about how Advanced Permissions works:
- UpStream Manager and Administrator roles have access to everything, regardless of what’s in the XML permissions document.
- UpStream automatically adds view permission to when create, edit, delete, or copy are assigned to an object.
- If you want the user to be able to upload files, they must have the ‘upload_files’ or “Edit Files” capability enabled in WordPress, separately from the Advanced Permissions plugin
Available Fields
The following is a list of the field names that can be used in the <field name=”field-name“> tag:
Project Field Names
- title – the name/title of the project
- description – the description of the project
- status – the status of the project
- progress – the progress percent of the project (this is not editable, since it is auto-calculated)
- categories – the categories that the project belongs to
- owner – the owner of the project
- client – the client to which the project belongs
- client_users – the client users that are connected to the project
- start – the project start date
- end – the project end date
- reminders – email reminders
- records – time tracking/budgeting records
- comments – the comments section that appears at the bottom of the projects page
Milestone Field Names
- milestone – this is the title of the milestone (note that this is different from the other items, which use the field title)
- assigned_to – who the milestone is assigned to
- start_date – the start date
- end_date – the end date
- progress – the milestone progress
- tasks – the number of tasks under this milestone, both open and total (note that this is view only)
- categories – the categories that this milestone belongs to
- comments – the comments
Task Field Names
- title – the name/title of the task
- assigned_to – who the task is assigned to
- status – the task status
- progress – the progress percentage of the task
- milestone – the milestone that the task belongs to
- start_date – the start date for the task
- end_date – the end date for the task
- reminders – email reminders
- records – time tracking/budgeting records
- notes – the task notes
- comments – the comments
Bug Field Names
- title – the name/title of the bug
- assigned_to – who the bug is assigned to
- severity – the severity
- status – the status
- due_date – the bug due date
- reminders – email reminders
- records – time tracking/budgeting records
- description – the bug description
- file – the file (if attached)
- comments – comments
File Field Names
- title – the title of the file
- created_by – the uploaded by field
- created_at – the upload date field
- assigned_to – who the file is assigned to
- description – the description of the file
- file – the actual attachment
- comments – the comments
Note: For custom fields, you must enter the custom field slug as it is shown in the table on the Custom Fields page.