UpStream’s Forms module allows you to connect UpStream to all three major WordPress forms plugins.
Additional articles about UpStream Forms:
In this article we look at how to use UpStream with Ninja Forms.
Getting Started
UpStream Forms is compatible with most recent versions of Ninja Forms. The setup process is the same for each one.
If you want, you can use UpStream Forms with multiple forms plugins at the same time (for example, Ninja Forms and WPForms). We will explain how to do this later.
Once you install Ninja Forms, you can install and activate UpStream Forms.
Preparing Your Ninja Forms Form For UpStream
If you haven’t created a form yet, the first thing you will need to do is to enable Ninja Forms “Dev Mode”. This allows you to see IDs and set other values that you’ll need for UpStream.
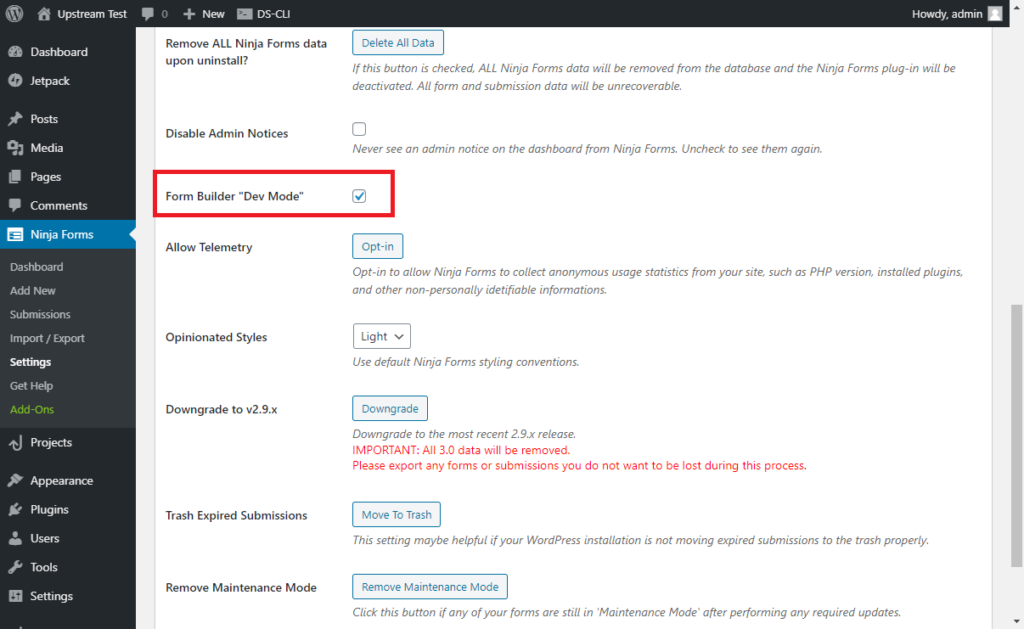
To enable “Dev Mode”, go to your WordPress admin dashboard, and then click Ninja Forms -> Settings. Then, scroll down and check the box marked “Form Builder ‘Dev Mode’” (marked red in the picture below).
Once you’ve done that you can create a form. In your WordPress admin dashboard, and click on Ninja Forms -> Add New. That will take you to a Wizard, which allows you to add a new form.
Once you have created the form, you will see a page where you can add fields:

On this page, you will add all of the fields that you want to populate into your project. You can click on the blue plus in order to add a field.
Setting Ninja Forms Field IDs
When you add a field, and click on the field, Ninja Forms will show you a properties page. On this properties page, there is an “Administration” section:
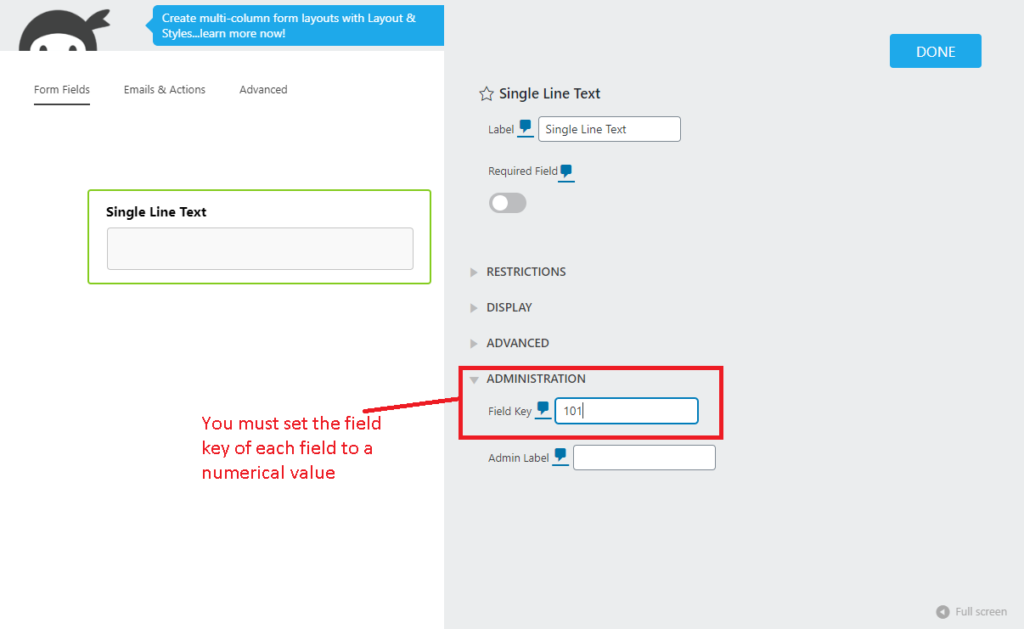
Under “Administration”, there is a setting titled “Field Key”. This is where you will enter IDs for each field, which you will use with UpStream Forms.
The ID you enter under “Field Key” must be a positive integer, but you can set it to whatever you choose (as long as it’s unique). Make note of all of the IDs of the fields you create.
You can use most of main the fields available in Ninja Forms, although there are some specific rules for certain field types. We will look at those later.
For now, let’s create a basic form with one field — the Project Title. After starting the form, add one “Single Line Text” field to your form, and set the label to “Project Title” (as in the image above).
Getting Your Form ID
You will need the ID of the Ninja Forms form before you connecting your form to UpStream.
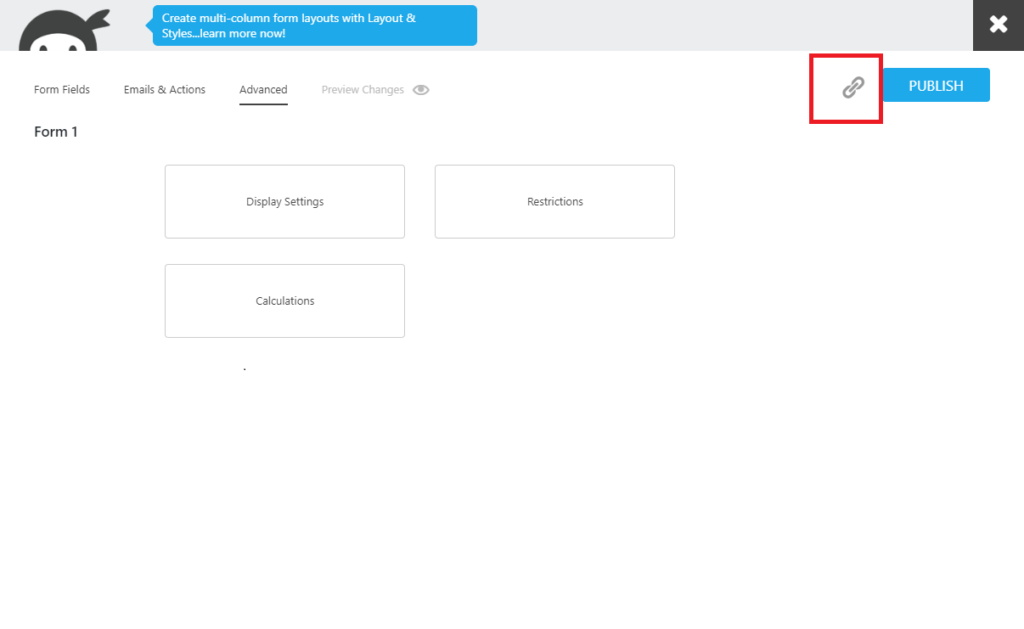
To do this, you will need to publish the form, and then click on the link icon at the top-right of the page (in the red box in the picture below):
Once you click on the link icon, you will see a properties page. Next to “Embed Your Form”, there is a field and a copy button. Clicking the copy button will copy the shortcode to your clipboard.
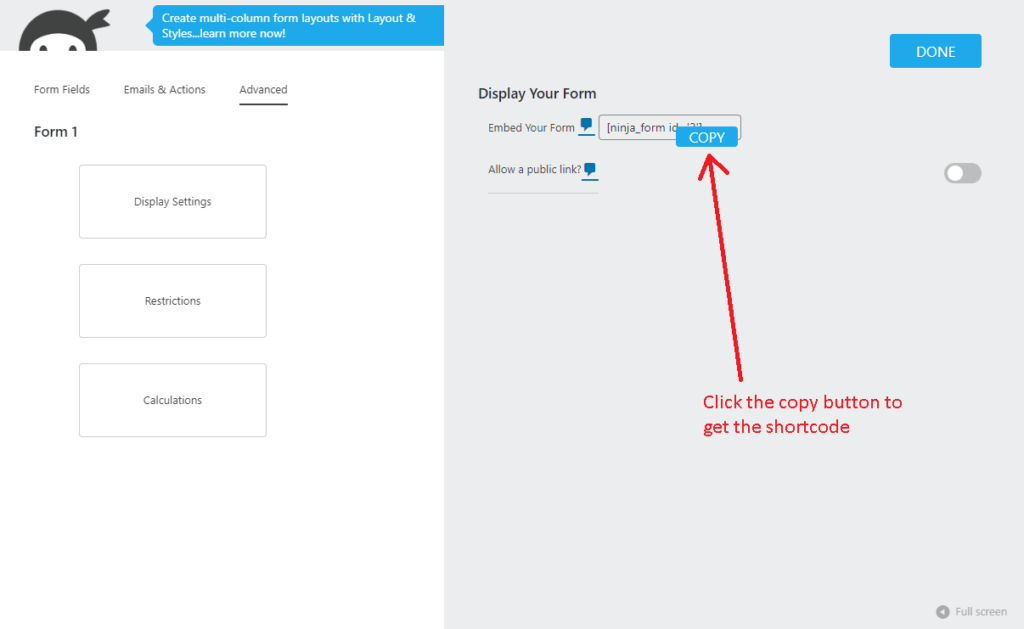
Click the “Copy” button and paste the shortcode somewhere you can see it. It should look like this:
[ninja_form id=’2′]
Make note of the number in single quotes (2 in the example above). That’s the form ID. You will need this, so write it down.
Connecting Your Ninja Forms Form To UpStream
In this section, we will take the simple form we created in the last section and connect it to UpStream, so that by submitting the form, a user can create a project with a title entered by the user.
After installing and activating the UpStream Forms addon, go to your WordPress dashboard, and then go to UpStream -> Forms. You will see a page like below.
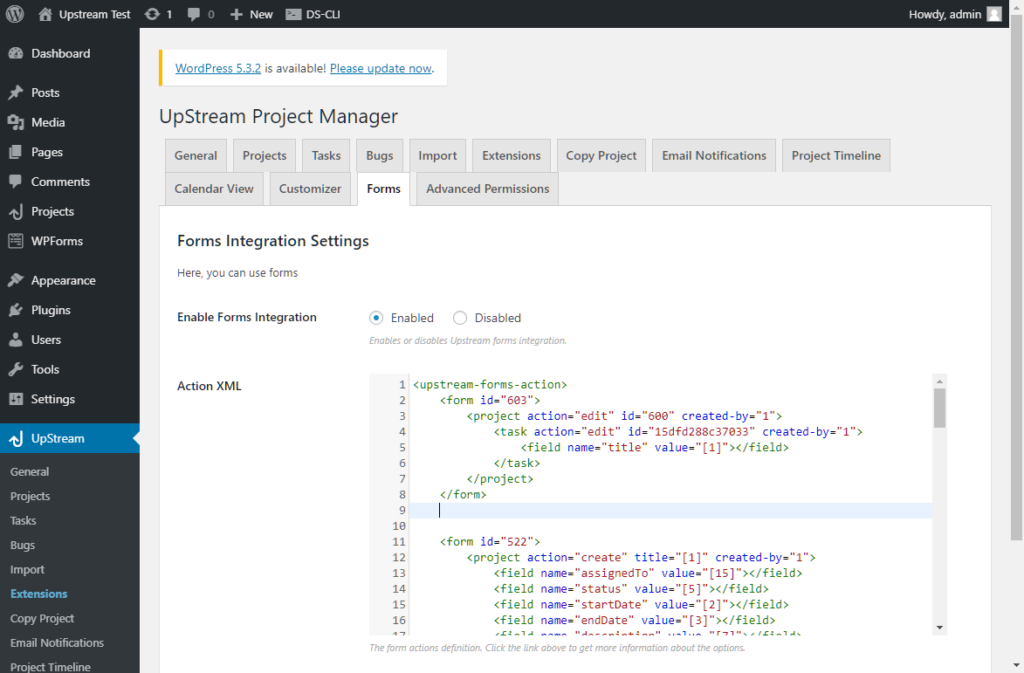
The Action XML field is where all of the magic happens. In that field, you can enter the rules that tell UpStream how to handle each Gravity Forms form field.
Let’s take a look at a very basic Action XML:
<upstream-forms-action>
	<form id="1">
		<project action="create" title="[1]" created-by="1">
		</project>
	</form>
</upstream-forms-action>
Every Action XML starts with an <upstream-forms-action> tag. You can see that this tag is opened on line 1 and closed on line 6.
Line 2 is where the rule begins. UpStream can handle multiple Ninja Forms (or WPForms, etc.) forms at the same time. For each form, UpStream expects a <form> tag. The <form> tag has an id parameter, which is the ID of the form.
In the last section, we explained where to find the form ID in Ninja Forms. Check above if you need help finding it.
Since our Ninja Forms form had the ID 2, we would enter that as the id parameter in our <form> tag.
Line 3 tells UpStream to create a new project. The <project> tag tells UpStream to create a new project when this Ninja form with ID 2 is submitted. The parameters title and created-by are required, and tell UpStream what the title of the project should be, and who the creator should be.
The first part, title=”[1]”, sets the title of the new project to what the user entered in the Ninja Forms field with the ID 1. Remember, we set the ID for each field — you can check here for instructions on how to set the ID of each field.
The second part, created-by=”1″ sets the creator of the form to the WordPress user with ID 1 — admin.
So after the Ninja Forms form is submitted, the Action XML above will create a new project, and set the title of that project to whatever the user entered in the first Ninja Forms field.
You can also enter text, or multiple field values, into any of the attributes. For example, you could change the previous code to this:
<upstream-forms-action>
	<form id="1">
		<project action="create" title="Project [1] by [2]" created-by="1">
		</project>
	</form>
</upstream-forms-action>
This code would create a project like before, but the title would be set differently. It would use the values the user entered in fields ID 1 and 2, and turn them into a string.
For example, if the user entered “Gutenberg” in the field with ID 1, and “Mike” in the field with ID 2, the new project would get the title “Project Gutenberg by Mike”.
Setting Other Project Fields
You will obviously want to set more than just the project title. For example, you may want to set the description, start date, end date, or owner. To do this, you will add a <field> tag under the <project> tag in your XML.
Here’s an example:
<upstream-forms-action>
	<form id="522">
		<project action="create" title="[1]" created-by="1">
			<field name="assignedTo" value="[15]"></field>
			<field name="status" value="[5]"></field>
			<field name="startDate" value="[2]"></field>
			<field name="endDate" value="[3]"></field>
			<field name="description" value="[7]"></field>
			<field name="clientId" value="[8]"></field>
		</project>
	</form>
</upstream-forms-action>
Each of the field tags in the XML set the value of an individual project field. For example, the XML causes UpStream to set the description of the new project to whatever the user entered in your Ninja Forms field with ID 7.
You can find a full list of fields below.
Some fields, such as status or startDate/endDate require special setup in Ninja Forms in order to work. We will explain how to do that in a later section.
Adding Tasks, Milestones, Bugs, and Files
You can add tasks, milestones, bugs, and files to projects by adding tags under the <project> tag in your XML.
Here’s a simple example that creates a task, milestone, and bug in a project.
	<form id="522">
		<project action="create" title="[1]" created-by="1">
			<field name="assignedTo" value="[15]"></field>
			<field name="status" value="[5]"></field>
			<field name="startDate" value="[2]"></field>
			<field name="endDate" value="[3]"></field>
			<field name="description" value="[7]"></field>
			<field name="clientId" value="[8]"></field>
			<milestone action="create" title="[11]" created-by="1">
				<field name="description" value="[19]"></field>
			</milestone>
			<task action="create" title="[20]" created-by="1">
				<field name="notes" value="[26]"></field>
			</task>
			<bug action="create" title="[31]" created-by="1">
				<field name="description" value="[35]"></field>
			</bug>
		</project>
	</form>
With this code, when the Ninja Forms form with ID 522 is submitted, a new project is created with a task, milestone, and bug.
The task name/title is set to what the user entered in the Ninja Forms field with ID 20. The task notes are set to whatever the user entered in the Ninja Forms field with ID 26.
A bug is created, with the bug title set to the Ninja Forms field with ID 31. The bug description is set to the Ninja Forms field with id 35.
And a milestone is created with the title set to Ninja Forms field ID 11, and the description set to Ninja Forms field ID 19.
Ninja Forms Field Types With UpStream Forms
There are a few things you need to know when building your form for UpStream Forms.
Many of the fields can transfer directly over to UpStream, but certain fields require special handling. Please read the following to ensure that you setup your form correctly.
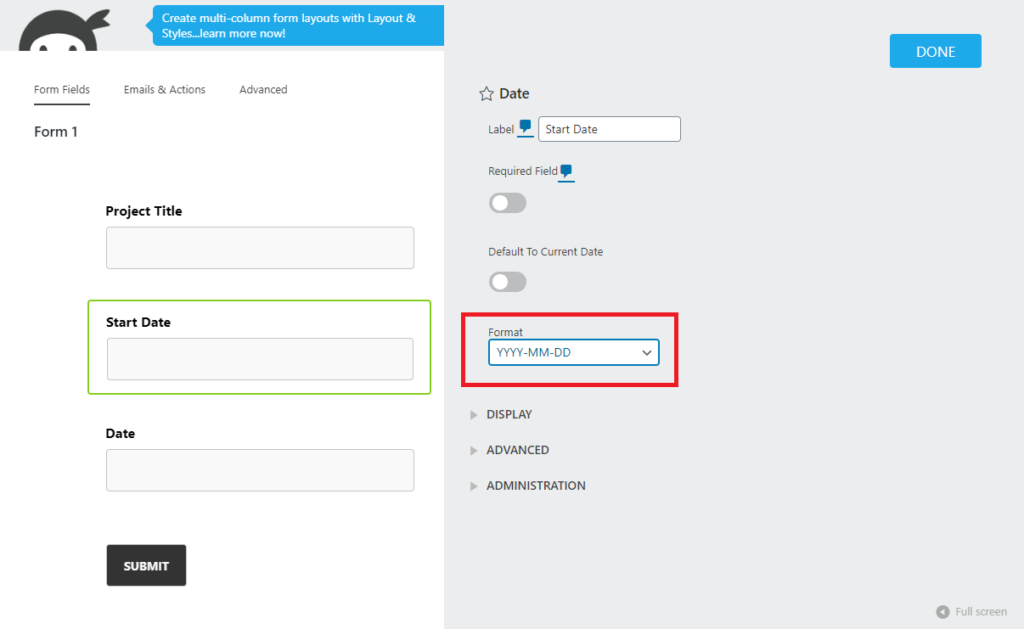
Date Fields
If you add a Date field to your form, you need to make sure that the “Format” is set to “YYYY-MM-DD”.
Dropdown/Multiple Choice/Checkbox Fields
What you enter in dropdowns, multiple choice fields, or checkbox fields must match the value you set for a field in UpStream. This depends on the type of field you’re trying to set in UpStream:
UpStream Assigned User/Owner
You have three different options to set the assigned user or owner of a project, task, file, or bug.
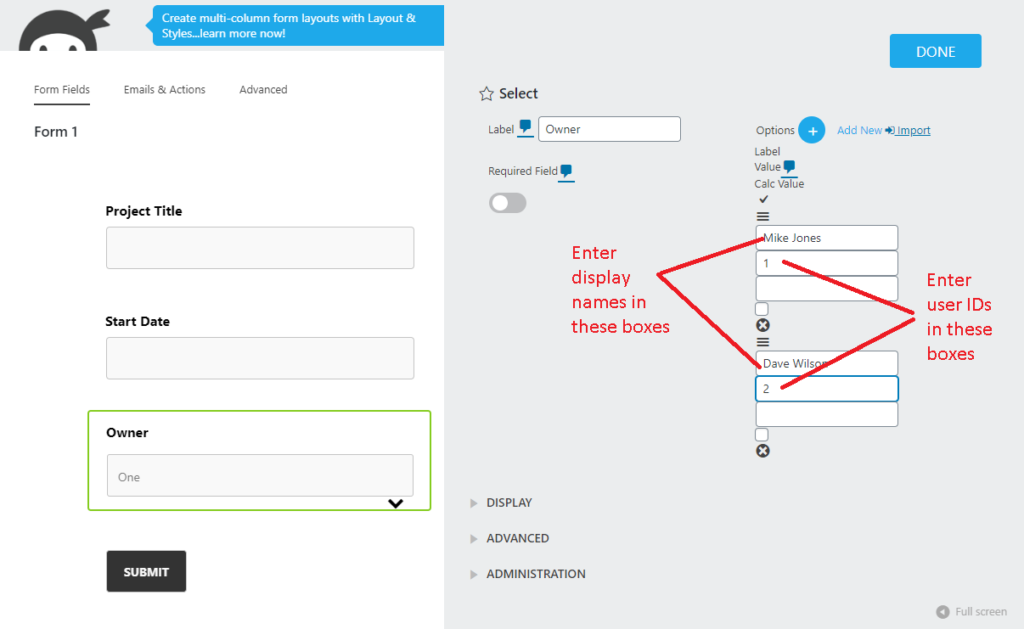
To set the assigned user/owner by the WordPress user ID, you will need to create a dropdown, checkbox, or radio button group. Then, under “Options”, enter the person’s name in the first box, and their user ID in the second box.
You can see an example below:
When you create your XML, you can refer to this field like this (change the number 4 to the ID of your field):
<field name=”assignedTo” value=”[4]”></field>
To set the assigned user/owner by email, do the same thing as above, except enter email addresses in the second boxes under the “Choices” setting in Gravity Forms.

Once you have created the field, you can refer to it in the XML like this (change the number 4 to the ID of your field) :
<field name=”assignedTo:byEmail” value=”[4]”></field>
To set the assigned user/owner by WordPress username, you can enter that in the second box under “Choices” in Gravity Forms.
You can reference that field in the XML like this (change the number 4 to the ID of your field) :
<field name=”assignedTo:byUsername” value=”[4]”></field>
UpStream Project Client ID
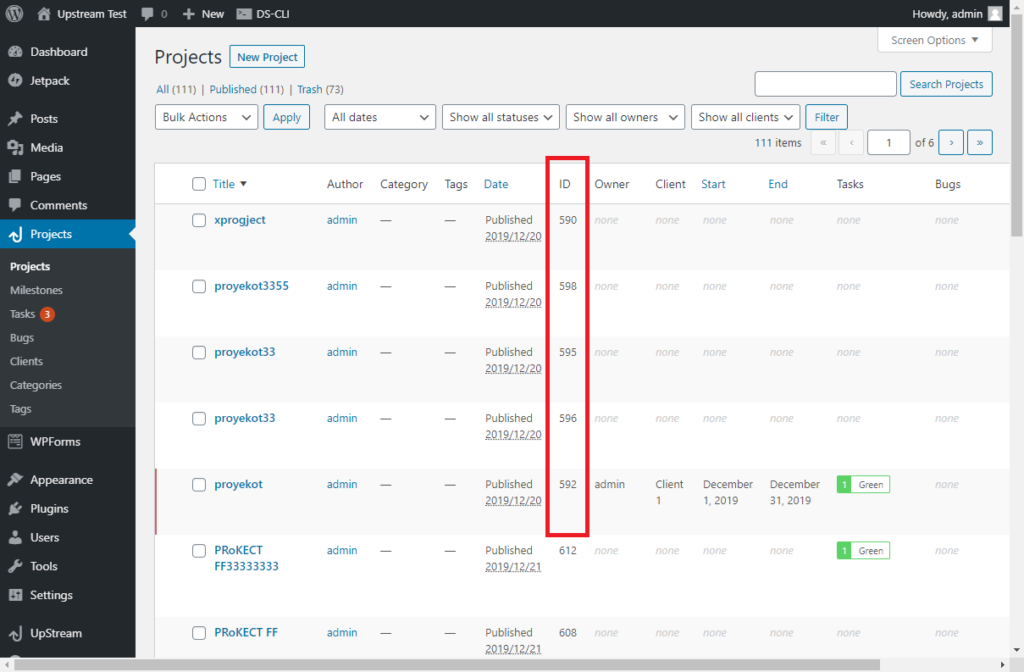
In UpStream, you can find client IDs by going to your WordPress dashboard and then going to Projects -> Clients. In the table, you will see the ID for each client.
To set a client ID for a project via a Ninja Forms form, you will need to enter integer client IDs in the second box under the “Options” setting in Ninja Forms. In order to do this, create a select or radio field.
Finally, enter the client name in the first box and the client ID in the second box for each option in the “Options” section:
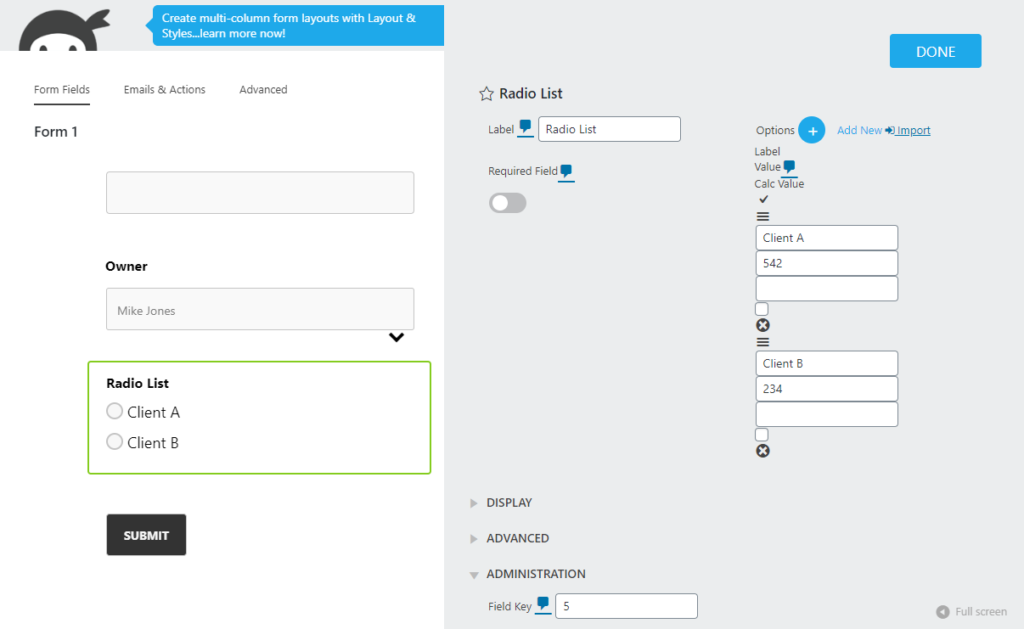
You can then reference the field in the XML like this (change the number 5 to the ID of your field):
<field name=”clientId” value=”[5]”></field>
UpStream Status
To create project, task, or bug status fields in Ninja Forms for use with UpStream, you can do the following.
First, go to Ninja Forms and create a select or radio button field (don’t use a checkbox, since you can’t have multiple statuses).
Next, go to your WordPress dashboard, and then go to UpStream -> Projects (or tasks, or bugs). On that page, you will see status options. You can see the page below:
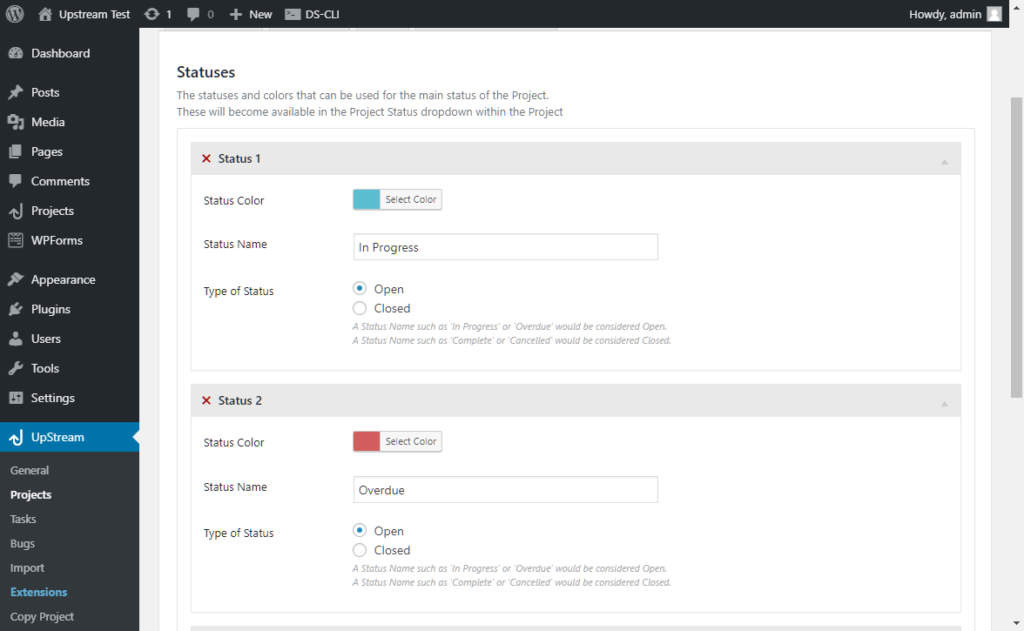
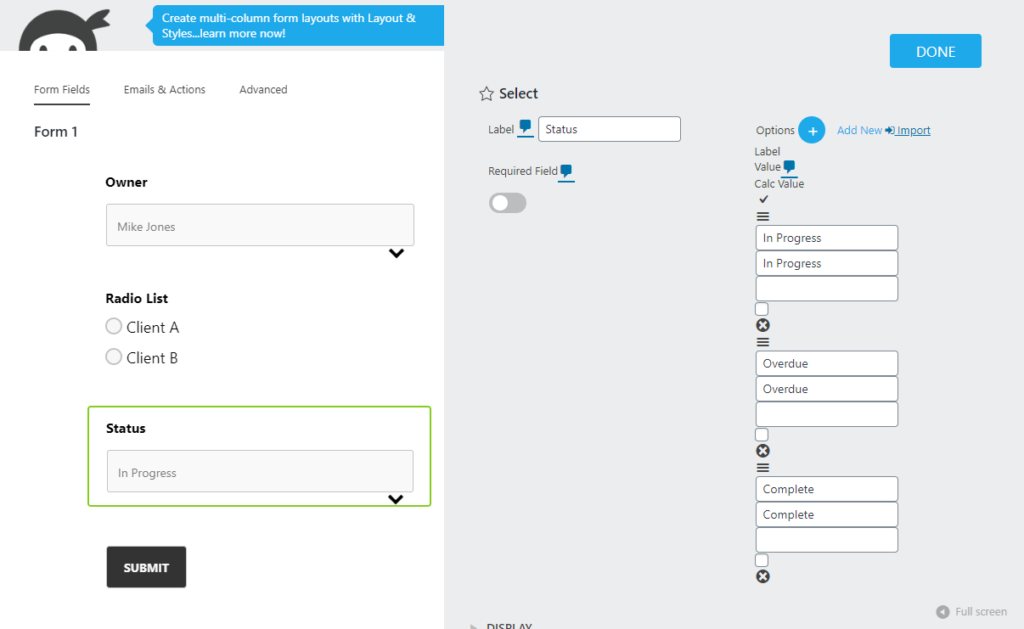
For each status, copy the text under “Status Name”. Then, go to Ninja Forms, and in the “Options” section, enter the copied text in both the first AND second boxes of each option. See below for an example:
UpStream Bug Severity
To create a bug severity fields in Ninja Forms for use with UpStream, you can follow a similar procedure as above.
First, go to Ninja Forms and create a select or radio button field (don’t use a checkbox, since you can’t have multiple severities).
Next, go to UpStream and go to your WordPress admin, then UpStream -> Bugs. Scroll down, and you will see severity options.
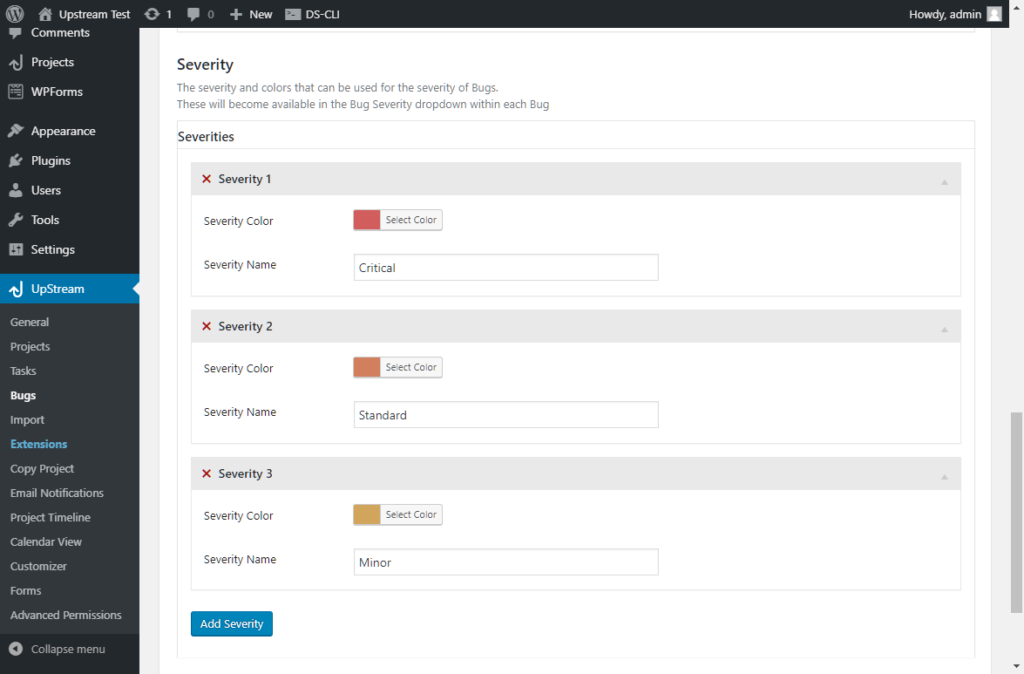
For each option, copy the text under “Severity Name” into both the first and second boxes under “Options” section in Ninja Forms.
Color Fields
To set a color field via a Ninja Forms form, you will need to create a select or radio button field.
Then, you can enter a hex color definition (example: #FF00FF) in the second box under the “Options” setting in Ninja Forms. In order to do this, create a select or radio field.
Then, enter the color name (or however else you want to describe the color) in the first box and the hex color in the second box for each option in the “Options” section.
Project and Milestone Categories
Unlike WPForms, Ninja Forms does not allow for taxonomy fields. So you cannot auto-populate categories for projects or milestones.
Therefore, in order to create category or tag fields, you will need to manually enter category/tag names and IDs into your form. Use the instructions above for standard dropdowns in order to do this.
After creating the field, use it in your UpStream Forms XML just as you would use any other field, using the field name categoryIds.
Attaching A Task To A Milestone
You can attach a milestone to a task by setting the milestoneId field of the task. This can be done in multiple ways.
If you have an existing milestone, and you want to attach a new task to it, you can set the milestoneId field just like you would set any other field. For example, you could create a dropdown or multiple choice field with the milestone ID as the value.
You can also use references, which are explained next.
Using References To Set Milestones for Tasks And Other Properties
When you create tasks, milestones, files, and bugs using a form, they are automatically added to the parent project from the UpStream Forms XML. However, this method doesn’t allow you to attach a milestone to a task. In this section, we explain how to use references to do this.
In the following example, we create a project, task, and milestone. Since the task and milestone are under the project in the XML, they will be created within the project.
<upstream-forms-action>
	<form id="522">
		<project action="create" title="[1]" created-by="1">
			<milestone action="create" title="[11]" created-by="1">
			</milestone>
			<task action="create" title="[20]" created-by="1">
			</task>
		</project>
	</form>
</upstream-forms-action>
The problem with this is that since the <milestone> tag and the <task> tag go directly beneath the <project> tag, there is no way to attach a task to a milestone.
To resolve this problem, we added references. When you create a project, task, milestone, file, or bug, you can provide a reference code, which can be used later in the XML to refer to the created item.
Let’s look at the following rewrite of the code above:
<upstream-forms-action>
	<form id="522">
		<project action="create" title="[1]" created-by="1">
			<milestone action="create" title="[11]" created-by="1" ref="my_milestone">
			</milestone>
			<task action="create" title="[20]" created-by="1">
				<field name="milestoneId" value="{my_milestone.id}"></field>
			</task>
		</project>
	</form>
</upstream-forms-action>
On line 4, we have added ref=”my_milestone”. When the milestone is created, it is assigned to the reference my_milestone. That reference can be used in any future value field in order to reference the properties of my_milestone.
The most common use of references is to link a milestone to a task. In line 7, we use the reference to my_milestone to set the milestoneId for the task.
To use a reference in a value field, you need to enclose it with curly brackets. You can use most (but not all) of the properties below with references. So you can do something like this:
<upstream-forms-action>
	<form id="522">
		<project action="create" title="[1]" created-by="1">
			<milestone action="create" title="[11]" created-by="1" ref="my_milestone">
			</milestone>
			<task action="create" title="[20]" created-by="1">
				<field name="title" value="{my_milestone.title}"></field>
				<field name="milestoneId" value="{my_milestone.id}"></field>
			</task>
		</project>
	</form>
</upstream-forms-action>
That sets the title of the new task to the same title as the milestone, and attaches the task to the milestone.
Using Ninja Forms To Edit Existing Projects/Tasks/Etc.
In addition to creating projects, milestones, tasks, bugs, and files with forms, you can also make edits.
To do this, you will need to create an XML that tells UpStream Forms what to edit based on ID. For example, here’s how to set the title of a task that already exists:
The first thing you will need to do is find the IDs of the task and the parent project. You can find project IDs in the list in your WordPress dashboard -> Projects.
You can then find the IDs for tasks, milestones, files, and bugs next to the titles in edit project:

Once you have all of the IDs, you can create the XML:
<upstream-forms-action>
	<form id="603">
		<project action="edit" id="600">
			<task action="edit" id="15dfd288c37033">
				<field name="title" value="[1]"></field>
			</task>
		</project>
	</form>
</upstream-forms-action>
In the example above, when the Ninja Forms form with ID 603 is submitted, UpStream Forms will find the project with ID 600, and then its child task with ID 15dfd288c37033. It will then set the title of that task to whatever the form submitter entered in field #1.
Note the differences between this XML and the ones above. On lines 3 and 4, instead of using action=”create”, we use action=”edit”. We also provide the id instead of a title. When you use the action=”edit” command, you must provide an id. Also, notice that the created-by attribute is no included in this XML (it is only used when creating new items).
List Of UpStream Object Properties
Project Fields
| Field | Description | Field Type |
| title | The title of the project. | Single Line Text |
| description | The description of the project. | Single Line Text or Paragraph Text |
| status | The status of the project. You will need to set this field up using the instructions above. | Dropdown or Radio |
| categoryIds | The IDs of the categories of this project. | Checkboxes, Dropdown, Multi select, or Radio |
| assignedTo | The WordPress user ID of the owner of the project. You will need to create a dropdown or radio field using the instructions above. | Dropdown or Radio |
| assignedTo:byUsername | The WordPress username of the owner of the project. You will need to create a dropdown or radio field using the instructions above. | Dropdown or Radio |
| assignedTo:byEmail | The email of the WordPress user to set as the owner of the project. You will need to create a dropdown or radio field using the instructions above. | Dropdown or Radio |
| startDate | The start date of the project. | Date formatted as yyyy-mm-dd |
| endDate | The end date of the project. | Date formatted as yyyy-mm-dd |
| clientId | The client ID of the client to attach this project to. You will need to create a dropdown or radio field using the instructions above. | Dropdown or Radio |
Task Fields
| Field | Description | Required Data Type |
| title | The title of the task. | Single Line Text |
| notes | The notes for the task. | Single Line Text or Paragraph Text |
| status | The status of the task. You will need to set this field up using the instructions above. | Dropdown or Radio |
| assignedTo | The WordPress user ID of the owner of the task. You will need to create a dropdown or radio field using the instructions above. | Dropdown or Radio |
| assignedTo:byUsername | The WordPress username of the owner of the task. You will need to create a dropdown or radio field using the instructions above. | Dropdown or Radio |
| assignedTo:byEmail | The email of the WordPress user to set as the owner of the task. You will need to create a dropdown or radio field using the instructions above. | Dropdown or Radio |
| milestoneId | The ID of the milestone this task is attached to. | Dropdown, Radio, or Reference |
| startDate | The start date of the task. | Date formatted as yyyy-mm-dd |
| endDate | The end date of the task. | Date formatted as yyyy-mm-dd |
| progress | The numerical progress percentage. UpStream only accepts integer multiples of 5 between 0 and 100. (Example: 0, 5, 10, 15, …) | Number, Dropdown, or Radio |
Milestone Fields
| Field | Description | Required Data Type |
| title | The title of the milestone. | Single Line Text |
| notes | The notes for the milestone. | Single Line Text or Paragraph Text |
| color | The color of the milestone. You will need to set this field up using the instructions above. | Dropdown or Radio |
| categoryIds | The category IDs of the milestone. | Checkboxes, Dropdown, or Radio |
| assignedTo | The WordPress user ID of the owner of the milestone. You will need to create a dropdown or radio field using the instructions above. | Dropdown or Radio |
| assignedTo:byUsername | The WordPress username of the owner of the milestone. You will need to create a dropdown or radio field using the instructions above. | Dropdown or Radio |
| assignedTo:byEmail | The email of the WordPress user to set as the owner of the milestone. You will need to create a dropdown or radio field using the instructions above. | Dropdown or Radio |
| startDate | The start date of the milestone. | Date formatted as yyyy-mm-dd |
| endDate | The end date of the milestone. | Date formatted as yyyy-mm-dd |
File Fields
| Field | Description | Required Data Type |
| title | The title of the file. | Single Line Text |
| description | The description of the file. | Single Line Text or Paragraph Text |
| assignedTo | The WordPress user ID of the owner of the file. You will need to create a dropdown or radio field using the instructions above. | Dropdown or Radio |
| assignedTo:byUsername | The WordPress username of the owner of the file. You will need to create a dropdown or radio field using the instructions above. | Dropdown or Radio |
| assignedTo:byEmail | The email of the WordPress user to set as the owner of the file. You will need to create a dropdown or radio field using the instructions above. | Dropdown or Radio |
| fileId | The WordPress media ID of the file. You will need to upload the file separately. | Dropdown, Multiple Choice, Number |
Bug Fields
| Field | Description | Required Data Type |
| title | The title of the bug. | Single Line Text |
| description | The description of the bug. | Single Line Text or Paragraph Text |
| dueDate | The due date of the bug. | Date formatted as yyyy-mm-dd |
| severity | The severity of the bug. You will need to set this field up using the instructions above. | Dropdown or Radio |
| status | The status of the bug. You will need to set this field up using the instructions above. | Dropdown or Radio |
| assignedTo | The WordPress user ID of the owner of the bug. You will need to create a dropdown or radio field using the instructions above. | Dropdown or Multiple Choice |
| assignedTo:byUsername | The WordPress username of the owner of the bug . You will need to create a dropdown or radio field using the instructions above. | Dropdown or Radio |
| assignedTo:byEmail | The email of the WordPress user to set as the owner of the bug . You will need to create a dropdown or radio field using the instructions above. | Dropdown or Radio |
| fileId | The WordPress media ID of the attached file. You will need to upload the file separately. | Dropdown, Radio, Number |
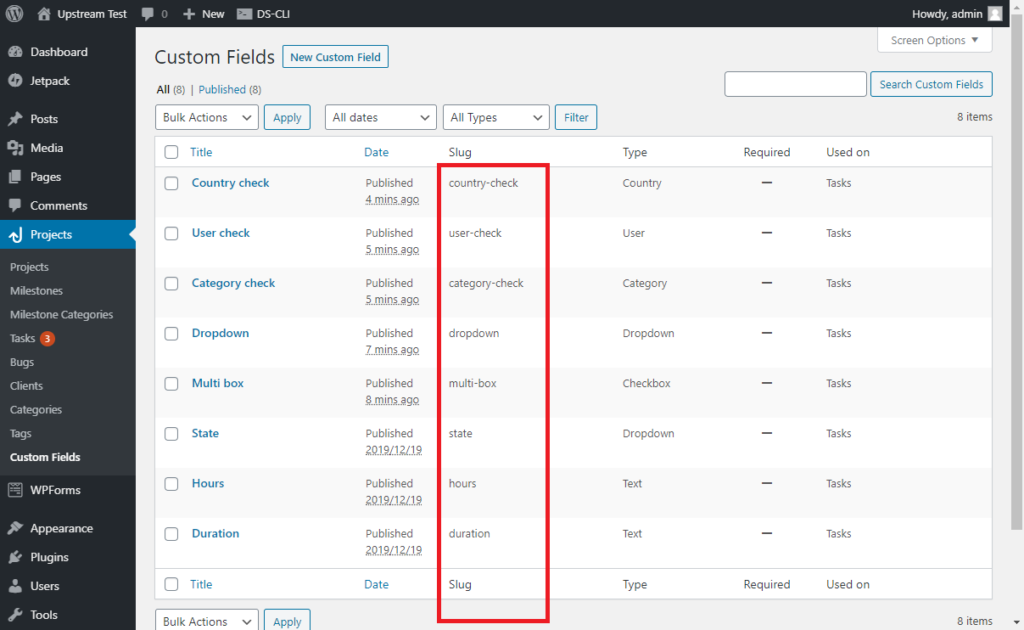
Using Custom Fields With Forms
To use UpStream custom fields with Ninja Forms, you will need to supply the slug for each field as the field name in the XML. You can find the slug in the custom fields list under Projects -> Custom Fields in your WordPress admin dashboard.
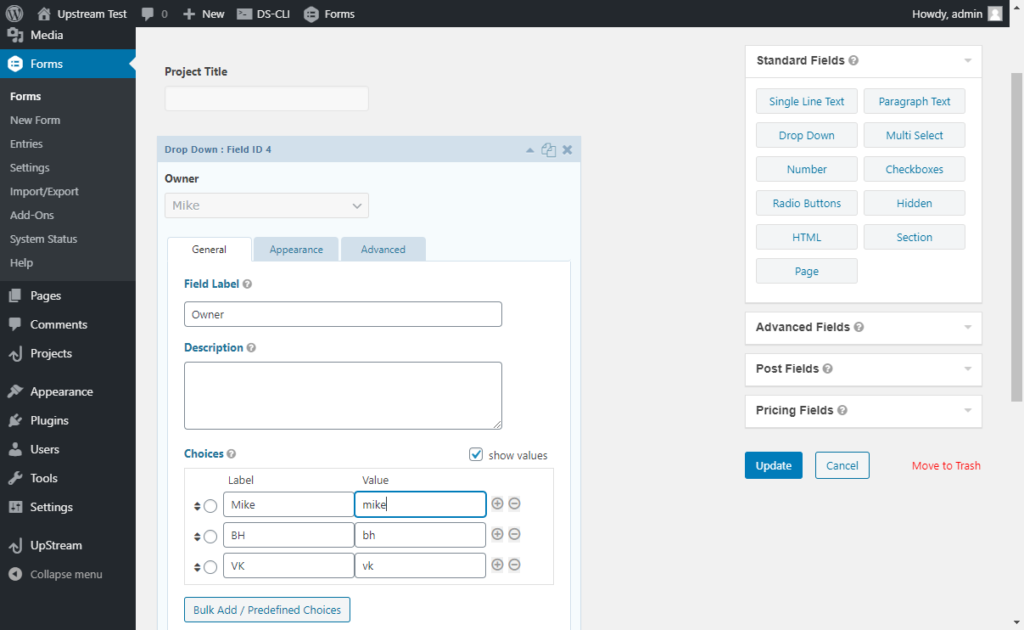
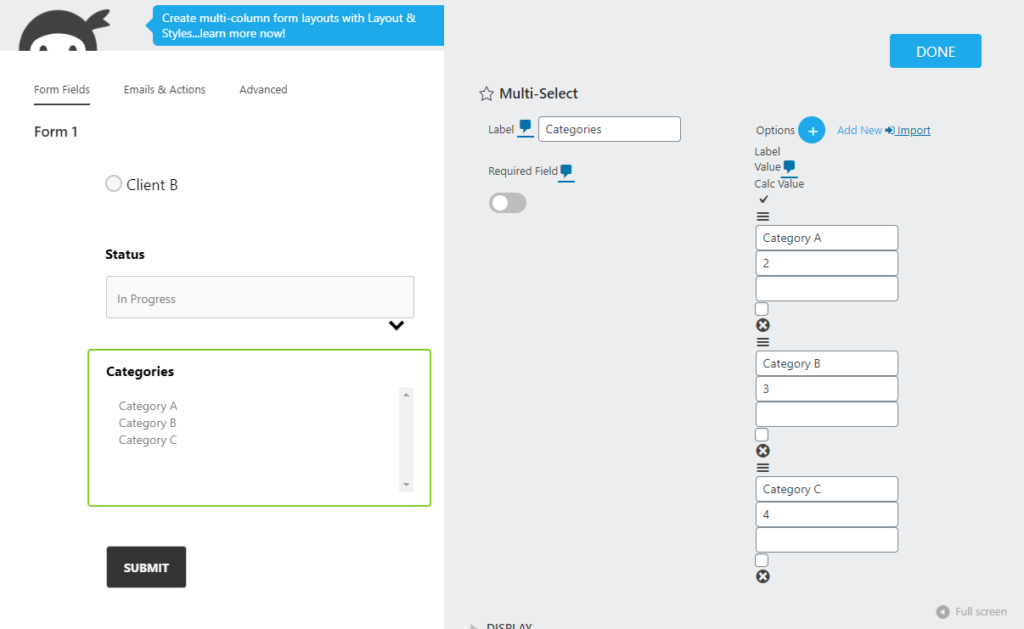
Dropdowns
For dropdown or checkbox custom fields, you must enter the value in your Ninja Forms field, as opposed to the label. You can see the correct field in the image below.
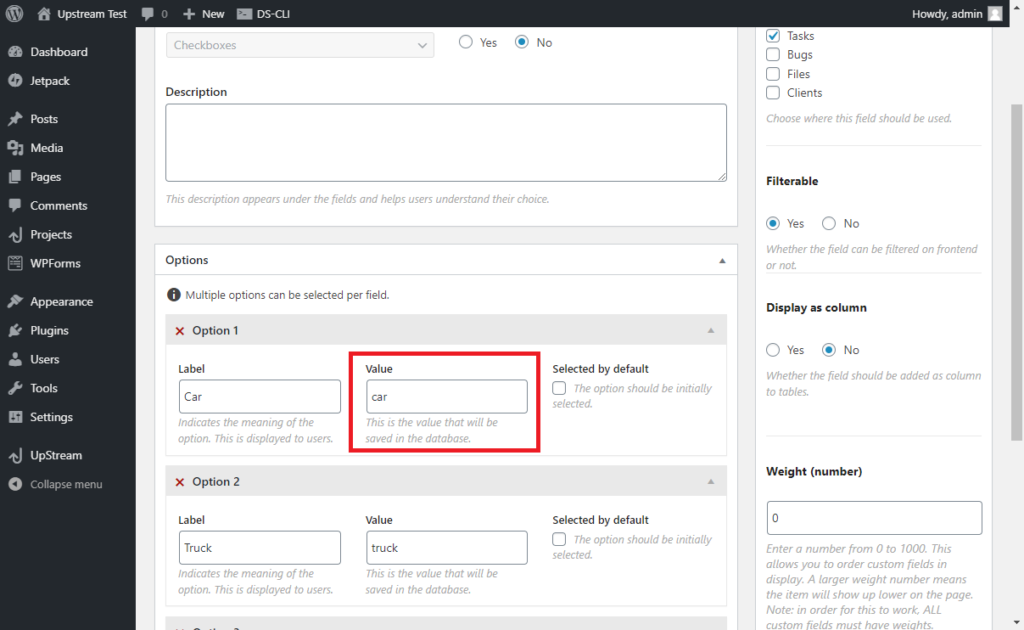
The value in the red box in the picture above must exactly match the value in the red box in the picture below:

Note that you can set the label and value to the same thing when you create your dropdown Custom Field to help with setup.
User Fields
User custom fields work a lot like assignedTo above, but you can only use user IDs — not emails or user logins. If you choose allow multiselect within UpStream Custom Fields, this Ninja Forms field should be a checkbox or multiselect. Otherwise, it can be a dropdown or radio.
This field only accepts numerical user IDs, which you can find in WordPress. Here’s an example of the corresponding XML:
<upstream-forms-action>
	<form id="1054">
		<project action="create" title="p1" created-by="1">
			<task action="create" title="t1" created-by="1">
				<field name="user-check" value="[2]"></field>
			</task>
		</project>
	</form>
</upstream-forms-action>
Country Fields
The built in country field in Ninja Forms is NOT compatible with UpStream.
To create a country field, you will need to create a multiselect or select with the 3 letter country code as the value for the form — not the country name. You can find the 3 letter country code here.
Here’s an example of the XML that you would use with the form above.
<upstream-forms-action>
	<form id="1054">
		<project action="create" title="p1" created-by="1">
			<task action="create" title="t1" created-by="1">
				<field name="country-check" value="[1]"></field>
			</task>
		</project>
	</form>
</upstream-forms-action>